A few months ago, while driving home from the weekly Fairway run, we are at a stop light in Carroll Gardens. The radio is playing, my Mother in the passenger seat, the sun is shining. This must have been before the June rains.
She is complaining about something, I don't remember what. Probably politics, it's a favorite subject for her. This day, a low point. The week of grinding work has left me limp with exhaustion. The gnawing stress in the pit of my stomach, the knowledge of her misery wearing away at me all the more.
I closed my eyes, and suddenly, I am vapor. I am white gauze, light shining through, rippling in the sunlight. My vaporous self rises, rises, rises up out of the car and vanishes into the daylight. The vapor separates into mere wisps. I disappear. Where I once was, I am no longer. Just gone.
Every time I get into the car and head over to Fairway, the same image returns. It was there again, today. I've become accustomed to it. The sensation I had that day, with that image, was very complete. Now the sensation is that of a memory, which is a different experience. More like an observer of the event rather than the participant. I miss the participant feeling, wishing it could return. Each time I get in the car, I search for it, but it remains a memory rather than a re-creation.
Saturday, July 25, 2009
Thursday, July 23, 2009
Upholstering, Part 3
Third class in the series. Time to stuff the ottoman. Start with cotton batting. Spray some glue, called #313 (memory fails me, it was 2 days ago). Place cotton batting evenly across the top, filling in all the spaces, don't over stuff. Next, a large square of foam. First, spray around the sides, at the top, using heavier spray glue (#76?). And spray the upper half of all 4 sides of the foam. Wait a few minutes till the glue is tacky to the touch. Now, pull the glue edge of the foam down over itself and apply it to the glue covered sides. The foam stretches to accommodate this maneuver! The end result is the foam curving over the edges and stuck around all 4 sides onto the ottoman. Now cover the entire top with a large square of dacron, staple it down and trim the edges. When doing the corners, don't let the dacron fold, make it a wrap around with no pleats. Staple, staple, staple!
Time to cut the fabric. Big moment. Lay it out on these nice large tables. Using a square, mark the fabric so you are cutting straight. Cut a 24" x 24" square. My scissors could have been a tad sharper, it felt like I had to really put some oomph into the cutting.
Take your newly cut square back to the ottoman and do a 4 point staple job - one staple in the center of each side. Make sure you are PULLING fabric tight! You want a firm feel on the top. You are watching the edge of the foam covered side to gauge your tension. Even tension! Start stapling on all sides, leaving about 2" at each end. This is so you can do a neat pleated fold later on.
How did I do? Well, first time out it was too loose. Pulled all the staples and started over. I am getting good at staple removal. A new skill! Hee. Second time around, with some help from the instructor, I saw how tight it needed to be. My right wrist was sore - carpal tunnel sore - from the effort. Whew! I am not as strong as I used to be. This took some serious physical effort on my part. But I got it done.
Then the instructor told me one side was a bit sloppy. I had pulled unevenly so it left the side feeling ridged - lumpy like. I pulled out the staples on that side and redid it. Now my wrist was really hurting.
Time to make the corners. This, like the foxface stage, was particularly vexing for me. I made several attempts, but in all cases the pleated fold was 'too high'. The idea is to pull that corner piece of fabric down hard, at a 45 degree angle till you see the foam give to the pressure. Then apply two staples on right angles to each other, to tack down the fabric. Now you fold the flap over, and before you tack it down, cut the inside triangle out. This is meant to reduce the bulkiness on the corner fold.
Now, the goal is to have the front and back sides of this ottoman with folds facing out. I worked the first two, with help from the instructor. Then as I was working the first corner on the back, after multiple attempts to get the fabric pulled down right, I made a near FATAL error. My brain did a dyslexic thing and I CUT THE WRONG PART of that triangle! EEEP! I realized as soon as I made the cut (about 2.5 inches up), it was just wrong. Wrong wrong wrong. I had cut into the part of the fabric that should have been visible.
Frightened to tell the instructor, who was busy sewing some edge cords for all of us, I approached him and said, "I think I may have made a huge mistake". I waited for him to finish his sewing and when he came over, he told me I was "seriously fucked". Oh boy. My options, according to him, would be to fold this piece in the opposite direction (and thus ruin any chances of this ottoman looking halfway decent) or cut another piece of fabric. I told him, "Wow, I've had a pretty rough day as it is, I hate these choices, both of them are really upsetting me and I might have to go home and cry!" To which he said, "hold on, let me see something." Next thing I know, he pulls the ruler out, does some quick measuring, rips out some staples and bing, bang, boom, he fixed the mistake and hid it under the fold.
What he did, which I cannot do because of my inexperience, was pulled the fabric over just enough so the cut was hidden under the fold. Relief! Thank you thank you thank you.
Next week we finish the sides. Despite the near calamity, the ottoman is looking pretty decent! I will take my camera to class to document the final stage.
Friday, July 17, 2009
Shetland ROCKS
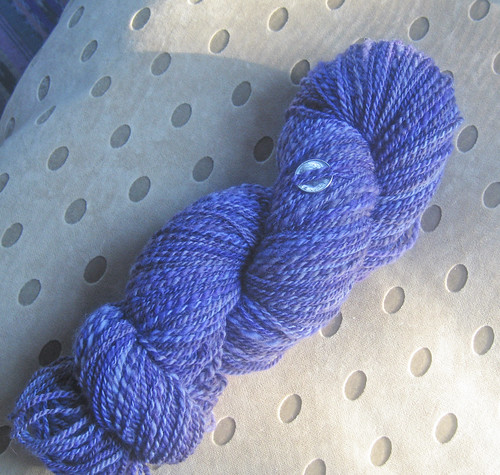
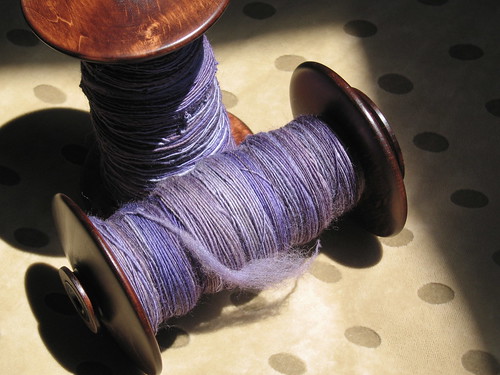
This is what I finished on Monday evening. I was so tired I could not speak. I just needed to spin, so I plied this gorgeous Shetland. The act of spinning the singles into my yarn transformed my mood, and eased my exhaustion, like nothing else could. I am so glad I have spinning in my life right now.
I averted a disaster thanks to the kind folks on Ravelry who coached me to run the overtwisted single back through the wheel, at a high tension setting. That took a good amount of the twist out and it made it much more balanced with the other single.
Interesting, when this came off the wheel, it kinked up like a mo-fo. The skein looked like a bunch of worms. This was the most 'active' skein of yarn ever to come off my wheel. It took a good long bath and ah.....after a Calgon moment this yarn relaxed.

But it still has a ton of spring and bounce. It's active yarn. I will be spinning more Shetland, I really love it. So all's well that ends well. Here we have 244 yards of wonderful Shetland yarn, 2 ply and it looks to be worsted!
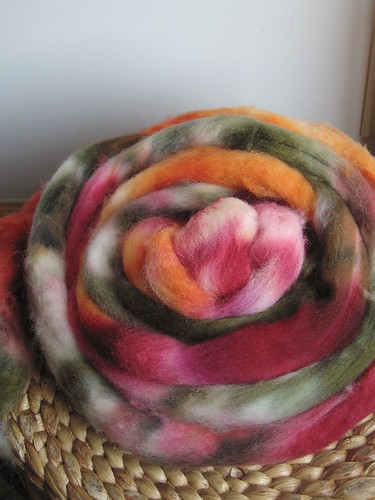
eta: This was spun from the Southern Cross Fibres June Club shipment. Wizard David, from Sydney Australia took themes from Impressionist paintings when dyeing the May club. This one is called Irises, and I have to say, the colors did remind me of the Irises in one of Monet's paintings. The really cool thing is there was a VERY active discussion on the SCF forums on Ravelry, which led up to the color choices for the monthly shipment. David kindly put the word out asking for input and boy, everyone jumped in with suggestions. It's been fun from because we were all involved in the process even before we got the shipment.
Interesting, when this came off the wheel, it kinked up like a mo-fo. The skein looked like a bunch of worms. This was the most 'active' skein of yarn ever to come off my wheel. It took a good long bath and ah.....after a Calgon moment this yarn relaxed.
But it still has a ton of spring and bounce. It's active yarn. I will be spinning more Shetland, I really love it. So all's well that ends well. Here we have 244 yards of wonderful Shetland yarn, 2 ply and it looks to be worsted!
eta: This was spun from the Southern Cross Fibres June Club shipment. Wizard David, from Sydney Australia took themes from Impressionist paintings when dyeing the May club. This one is called Irises, and I have to say, the colors did remind me of the Irises in one of Monet's paintings. The really cool thing is there was a VERY active discussion on the SCF forums on Ravelry, which led up to the color choices for the monthly shipment. David kindly put the word out asking for input and boy, everyone jumped in with suggestions. It's been fun from because we were all involved in the process even before we got the shipment.
Wednesday, July 15, 2009
The Thing We Have Been Wanting For So Long
Eight years ago I got a bee in my bonnet about moving out of Manhattan to Brooklyn. The economy was ok, pre 'dot-com' bubble burst, pre 9/11. Pre everything. Everything was la-dee-dah. And I thought we needed more living space and a brownstone seemed like a good idea. Hellbent, I was. In hindsight I just desperately needed to get out of Soho; living in a fishbowl shopping mall was simply no fun.
We shopped around and for reasons that are still unknown to me, I fell in love with a building in Park Slope that had been neglected for nearly 20 years. I mean SERIOUS neglect. It needed everything from a roof, to new plumbing and electric, ceilings, doors, you name it. I had fantasies of being able to completely restore it and bring it back to life.
On top of all the things wrong with the place, the number one thing was SRO. Meaning, Single Room Occupancy. As in, rooming house. As in, a layer of complexity that boggles the mind beyond anyone's imagination. You see, SRO makes it more difficult to secure a mortgage and filing plans with the City of New York to make alterations. Oh, the hoops we had to jump through! I could have joined the circus I was getting so good at hoop jumping.
But we dreamed of making the house into a legal 2-family dwelling. And we dreamed of restoring this house and making it a grand place to entertain, live comfortably, with no co-op boards or stompy feet above us. We would become landlords. Homeowners in the City. And, changing the SRO designation is a sure-fire way to increase the resale value. A holy Grail.
The odyssey we experienced turned into a nightmare when we hired all the wrong people - architect, contractor, plumber, electrician. All of them. WRONG. They laughed all the way to the bank on our dime. We made every mistake in the book and it cost us big time. Like when the plumbing inspector failed the work and it cost us $14K to fix it? Yea, that's just for starters.
The set backs, the delays, the complications, the expense. It added up fast. And it drained all our money and more. It drained my energy, my psyche, my everything. Throughout, the one thing I wanted more than all other things was the CofO. Getting that clearance became the one goal of all goal lines we needed to cross.
Expeditors, architects, paper pushers, all came and went. Checks were written, phone calls made. Pleading, cajoling, begging. I even tried doing the work myself! Brick walls. Speed bumps, inspections, move paper from one counter to the next. I am convinced the system is designed to keep normal citizens like me out of there! I would run out of Boro Hall practically screaming, it was all so insane!
Here we are, EIGHT years later and I am happy (exhausted, relieved, fed up) to report. After countless thousands of dollars and some more signed documents,
I honestly thought this day would never arrive. But somehow, it did. It's like a miracle or something? No, it's just a matter of spending enough money, I guess. And finally hiring someone who really understood the process. Done.
There are still things to do around here, and honestly I hesitate to do anything. Because every time we hire someone to do anything, I just know we are getting jacked 30% simply because of the address. And even after paying the premium, the workmanship is never completely satisfactory. Maddening. And everything, I mean everything is custom in this house. No such thing as going to Home Depot or Lowes to buy product. Oh No. That's too easy. Nope, it's got to be custom made. Know what? Custom made is expensive made. And hard to do right. Windows. Screens. Doors, Hardware. You name it. Custom.
So please excuse me my little cynical rant. It's sad, I want to be elated over the CofO. I really do want to feel the joy that comes from finishing a task as huge as this has been. But the cynicism has seeped into my bones by now. I mean it's eight years of frustration and dead ends. Now that we have this holiest of Grails, I want simply want OUT. I want to sell this albatross - ahem - brownstone and move on with our lives.
The idea floating now is this - scale down. Right size. Unchain the shackles. Make things manageable.
So Economy? Yea, you Economy? Straighten the fuck out now! Because I am so tired of putting life on hold and feeling weighted down by the load. I need you to get your act together and I promise, I will get mine together. You listening?
We shopped around and for reasons that are still unknown to me, I fell in love with a building in Park Slope that had been neglected for nearly 20 years. I mean SERIOUS neglect. It needed everything from a roof, to new plumbing and electric, ceilings, doors, you name it. I had fantasies of being able to completely restore it and bring it back to life.
On top of all the things wrong with the place, the number one thing was SRO. Meaning, Single Room Occupancy. As in, rooming house. As in, a layer of complexity that boggles the mind beyond anyone's imagination. You see, SRO makes it more difficult to secure a mortgage and filing plans with the City of New York to make alterations. Oh, the hoops we had to jump through! I could have joined the circus I was getting so good at hoop jumping.
But we dreamed of making the house into a legal 2-family dwelling. And we dreamed of restoring this house and making it a grand place to entertain, live comfortably, with no co-op boards or stompy feet above us. We would become landlords. Homeowners in the City. And, changing the SRO designation is a sure-fire way to increase the resale value. A holy Grail.
The odyssey we experienced turned into a nightmare when we hired all the wrong people - architect, contractor, plumber, electrician. All of them. WRONG. They laughed all the way to the bank on our dime. We made every mistake in the book and it cost us big time. Like when the plumbing inspector failed the work and it cost us $14K to fix it? Yea, that's just for starters.
The set backs, the delays, the complications, the expense. It added up fast. And it drained all our money and more. It drained my energy, my psyche, my everything. Throughout, the one thing I wanted more than all other things was the CofO. Getting that clearance became the one goal of all goal lines we needed to cross.
Expeditors, architects, paper pushers, all came and went. Checks were written, phone calls made. Pleading, cajoling, begging. I even tried doing the work myself! Brick walls. Speed bumps, inspections, move paper from one counter to the next. I am convinced the system is designed to keep normal citizens like me out of there! I would run out of Boro Hall practically screaming, it was all so insane!
Here we are, EIGHT years later and I am happy (exhausted, relieved, fed up) to report. After countless thousands of dollars and some more signed documents,
WE HAVE OUR OFFICIAL CERTIFICATE OF OCCUPANCY!!!
I honestly thought this day would never arrive. But somehow, it did. It's like a miracle or something? No, it's just a matter of spending enough money, I guess. And finally hiring someone who really understood the process. Done.
There are still things to do around here, and honestly I hesitate to do anything. Because every time we hire someone to do anything, I just know we are getting jacked 30% simply because of the address. And even after paying the premium, the workmanship is never completely satisfactory. Maddening. And everything, I mean everything is custom in this house. No such thing as going to Home Depot or Lowes to buy product. Oh No. That's too easy. Nope, it's got to be custom made. Know what? Custom made is expensive made. And hard to do right. Windows. Screens. Doors, Hardware. You name it. Custom.
So please excuse me my little cynical rant. It's sad, I want to be elated over the CofO. I really do want to feel the joy that comes from finishing a task as huge as this has been. But the cynicism has seeped into my bones by now. I mean it's eight years of frustration and dead ends. Now that we have this holiest of Grails, I want simply want OUT. I want to sell this albatross - ahem - brownstone and move on with our lives.
The idea floating now is this - scale down. Right size. Unchain the shackles. Make things manageable.
So Economy? Yea, you Economy? Straighten the fuck out now! Because I am so tired of putting life on hold and feeling weighted down by the load. I need you to get your act together and I promise, I will get mine together. You listening?
Tuesday, July 14, 2009
Upholstering, Part 2
In between customer appointments and office drudgery, I snuck a visit to Beckenstein Fabrics to pick up 3 yards of simple fabric for my ottoman in the making. Actually, it's a very nice linen with dark brown as the warp and a linen gray as the weft. The guy took pity on me, or maybe he was a little impressed when I told him it was for a class. He cut way more than 3 yards.
Again, no pictures, sorry. You'll see the finished product I promise.
Ok, so where were we? Oh yeah, tying springs. Five of them, hand tied front to back and side to side, total of 6 sets of ties. When we arrived, the entire first set was done for us. Our task was to finish the job.
Nail two little upholstery nails, aligned in front of each spring, centered as well as you can. Angle the nails inward so they can take the tension of the string wrapping around these thick coils. Take your jute twine and make double loops and secure on the two nails on top. Secure down with the hammer. Bang! This time, with oomph and swinging like a pro, no choke up the handle!
Begin tying down these coils. Very hard to explain the intricate series of wraps and tensioning, but suffice to say, I had to work it a few times before I was semi-satisfied. When crossing the twines already in place, work so the new twine is not touching. Some finesse here. There is a very specific way to make these wraps, involving coming over the top of the coil and down the front, back under the coil and up over again, on to the next one. And you stagger the first string - first wrap on the second coil rung, second wrap at the other side of the coil, but on the top rung, then across to the next spring, top rung and then down to the second rung again. When you reach the other side, wrap the twine around the little nail, add another nail right next to it, and wrap again. A figure-eight. Secure these nails down. Now jiggle the coils to ensure they are aligned straight up and down. We don't want no crooked springs!
And, go for a 'dome' effect, such that the sides of the springs closest to the edges are just a bit lower than the middle. Second string does the wrap thingie again, but on the second wrap, you are actually tying a knot around both strings. Again, hard to explain but seeing it, it begins to make sense. Sort of. I had to work slowly and concentrate to get this done.
After a good hour, I was done and it wasn't half bad. I worried about the dome thing. I am convinced my center spring is lower than the rest. Will that mean I will have a depression in the middle of my ottoman? Hope not! Wrap the string ends around and tuck in - trim if too long.
Cover the entire section with a square of burlap. Use the 4 point staple method. Secure one staple in the middle of each side and the work the burlap by pulling tight and stapling all along the edges, nice and neat. Fold over, staple down again and trim burlap to 1" all around. When folding the corners, cut away the excess so it lays flat.
Now the really tricky part. These burlap covered tubes of felt. They are called 'foxface'. Two long pieces, two shorter pieces. It is critical to staple these down TIGHT and so that the foxface is flush with the edge of the frame. HARD. VERY. HARD. to do. I went through lots of staples at this stage. I might have needed some help. Seems I was a bit tentative with the stapler. Could not get it securely down into the groove to make a solid join. My foxface was loosey goosey. Got it done. Barely.
Then go around the outside of the foxface and staple it down too. In other words, staple it very securely, on both sides and make sure it is flush with the frame. The smaller sections are done last, and fit within the longer pieces. When you're through you have a square of foxface all around, with some ends flapping that need to be cut off with a knife, flush with the foxface not the frame. Got that? Yeah, thought so.
Take some burlap squares and staple around the corners and wrap over the foxface corners, fold over, make it neat and staple down.
Cover all the open frame sections with squares of muslin, staple down, using the 4 point system and pull the muslin tight while securing with the staple gun. Fold edges up and over, staple down to make it neat, attention paid to corners.
It started to look like a piece of furniture.
This is harder than knitting. And harder than spinning. Not impossible, but it will take some practice. Having the right tools is essential. How to get them without breaking the bank. Lots to ponder. In the meantime I might tackle some small pillow projects, lampshade projects, that sort of thing.
The instructor was a bit cheerier this time, but still very intense. Barely tolerant at times. A bit chattier at others. Interesting.
Sunday, July 12, 2009
Sunday in July
The weather is spectacular. Too bad I've had to spend almost all weekend working on a presentation for a very serious and concerning meeting tomorrow morning. Work stress is rising, sleep is scarce.

Last night after toiling all day on the presentation, calculating and worrying about my future, I took a break to finish some yarn I started a week ago. It was 4AM before I finally passed out, but it was worth it! This yarn is lovely, and I have a project in mind already.

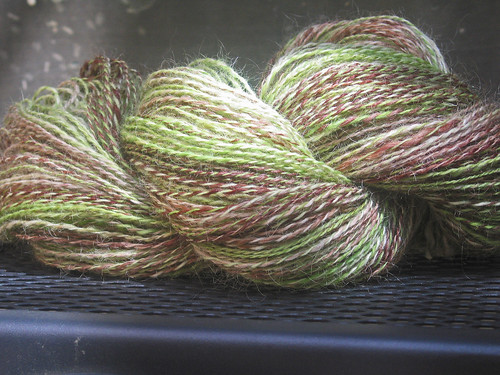
The yarn was spun from the Wensleydale Top I bought in May at the Mass Sheep and Wool Festival, from Spunky Eclectic. Wensleydale is a nice silky long wool. I like working with these long wools. I spun it to a fingering weight, and yielded about 328 yards from about 3.5 oz. It still needs to be soaked and set, but I was so pleased and the light in the backyard was so nice I didn't want to miss the opportunity to capture it before the weekly grind starts up.
Lest you think I have given up knitting altogether, here's proof that I do still knit! I picked up Nancy Bush's book Knitting Vintage Socks earlier this year but had not delved into any projects till now.
Last night after toiling all day on the presentation, calculating and worrying about my future, I took a break to finish some yarn I started a week ago. It was 4AM before I finally passed out, but it was worth it! This yarn is lovely, and I have a project in mind already.
The yarn was spun from the Wensleydale Top I bought in May at the Mass Sheep and Wool Festival, from Spunky Eclectic. Wensleydale is a nice silky long wool. I like working with these long wools. I spun it to a fingering weight, and yielded about 328 yards from about 3.5 oz. It still needs to be soaked and set, but I was so pleased and the light in the backyard was so nice I didn't want to miss the opportunity to capture it before the weekly grind starts up.
Lest you think I have given up knitting altogether, here's proof that I do still knit! I picked up Nancy Bush's book Knitting Vintage Socks earlier this year but had not delved into any projects till now.
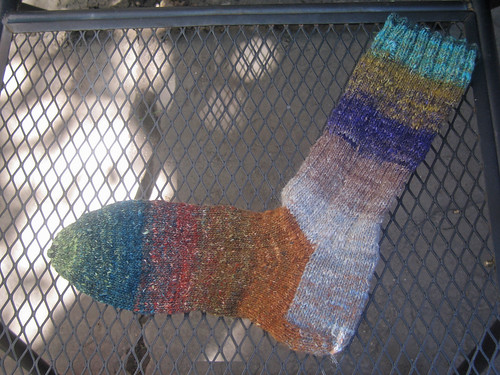
I don't know what it is about the Noro line, but I find myself drawn to it again and again. This is the Noro Silk Garden Sock yarn and it much more pleasant to work up than the Kureyon Sock Yarn. It's denser and softer even before it gets washed and blocked. These socks are going to be very warm! These colors, especially the ones in the foot are very pleasing combinations, and I'm pleased with the placement, since the foot will be more visible than the leg when worn.

One of the longer range goals within my knitting world is to knit up every pattern in the book. This is the first of several simple ribbed socks at the beginning and seemed like a good choice for a multicolor yarn like the Noro. The other patterns will likely be knit up in solids or semi-solid colors so it's nice to have one pair not like the others.
The second sock is already on the needles and will progress whenever the stress level gets me to the point that I cannot think. There is tons of stress, all job related. It may be time for me to face up to choices I've been wanting to make for a long time. I just need to navigate treacherous waters and it takes tremendous psychic energy to do so.
There is good news in all of this, and soon I will share some of it on this blog. Sometimes when things are stalled in one area, others open up. Forward, always moving forward. Except when I'm not. Confused? Yea, me too.
Wednesday, July 8, 2009
Upholstering, Part 1
Over the next four weeks I will give you a blow by blow (do you really want to hear it???) of my Upholstering class. I won't be able to share any pictures, because I cannot take pictures during the class (and still get the work done). The pace is fast. Very fast.
Last night was class #1. There are eight of us. The workshop is fairly large and all the tools are supplied for the class. Our project is to build an ottoman from the frame out to finished fabric. The frame was built in the wood shop adjacent to the studio. We are using classic upholstery technique - hand tied springs - to make these ottomans.
Our instructor flew through (I mean he FLEW through) the list of tools one would need to set up an at-home upholstery workshop. I tried to take notes but gave up! I simply cannot write fast enough. But he gave us some source information, one online, in case you get interested.
We were a busy beehive last night! First step was to attach jute webbing to the frame. The goal was to align three strips evenly spaced from front to back. To make the jute webbing super tight, you need a webbing stretcher. The webbing is attached to the frame using staples fired from an air compressed staple gun. These guns are special to the upholstery industry in that they have special noses to get into tricky places and do not require two hands to use. When upholstering, one needs a free hand to facilitate pulling fabric tight. Attach the staples on about a 45 degree angle, which is best for long term wear. Guess who wants an air compressed staple gun. Like right now. So cool.
Once the first three strips are stapled down, attach two more, in basket weave fashion, side to side. Then fold the jute back on itself, trim to about 1/2 - 1" and staple the end down. Watch your fingers, the gun is powerful!
So far, so good. Until we got to the next step: arranging 5 coil springs on top of the webbing. Guess what: two of the eight students accidentally attached the jute webbing to the BOTTOM part of the of the frame, not the TOP of the frame.
I bet you can guess who was in that group, huh. Little old knithound. And how did we realize this? Only the top of the frame has interior corner braces. You know, those corner braces that make furniture stronger.... heh. DOH!!
Now the two of us are RACING to get new webbing put down but of course, the first layer of webbing is creating a logistical barrier and it's really hard working the air compressor stapler (large coil cord attached to the ceiling) around the nooks and crannies of the ottoman with now TWO layers of webbing...and the instructor says nay, do not remove the errant webbing.
Needless to say, my stress level went up and...is it hot in here? Is the AC on?
We got that done despite the added challenge round, and then had to race to arrange the springs. Spring arrangement is an art, the upholsterer uses his eye to make the alignment evenly spaced and just so. Focus on the bottom rung of the coil, don't worry about the tops. A little zen here, but very knitterly too, that focus on the task at hand thing, don't look at the big pile o' stitches, you know? You've been there. You know what that is. Make sure the knot in the top of the coil faces inward.
Once there, trace a circle around each coil using a marker, noting the start of the coil with a bar and number each circle, moving counterclockwise around the furniture, ending in the center. And while removing each coil, use your marker to tag the coil so you know which coil goes where when you sew it to the webbing.
Now, take your marker and go around each traced circle, marking three points evenly spaced, 1 -- 2 -- 3 with the marker. This is where the stitches will go to secure the coil. Make sure the third stitch marked will be adjacent to the next coil so that you minimize the amount of thread running between coils. Aha!
My knitterly experience kicked in again, and the sewing was not hard, despite the HUGE needle - I'd say it was 6" or 7" long? Once all attached, it looked not bad for a first attempt! Turn the piece over and tighten the jute thread between each stitch and tie off with what looks like a half hitch. Remind me to go look that up.
Next step is adding upholstery tacks, 2 at a time, on the frame, centered in front of each coil. So you have 3 sets of 2 tacks in our case, both on the front frame and the back frame. Total of 12 tacks. I am not good with a hammer. Never have been. My tacks were a little...not in a straight line.. we are not talking a soldier line here. But they will have to do, because there was no time to fix them!
By this time I was hungry. And I kept getting the sense that the instructor was not really happy about teaching. It didn't help that when we started banging with a hammer we were all girly with them. He just about jumped out the window, the noise telling him we were not holding the hammers and using them as a pendulum. Bang!! bang bang! WAAAAAHHHHH! Okay, practice the hammer thing. Be a bit macho with it. Swing it! Duly noted.
I felt like I had absorbed a ton and was a bit relieved when the class was ending. Making that blunder earlier set me back and is making it more difficult to maneuver around the piece. But once covered, it won't show.
Next up, find 3 yards of fabric, and oh, try not to buy a pattern. Don't overcomplicate things, okay? Yea, got it.
Tuesday, July 7, 2009
The Good News Just Keeps Coming
Yesterday when I posted that link to the New York Times Lens blog we thought that would be the end of it. We were grateful, even. It's not every day that the New York Times shows an interest in what we are doing in our 'spare' time.
The story, by David Gonzalez is terrific. He encapsulated alot of what Jose was thinking when he worked on this epic (and ongoing) project. The blog also showcased a few of the photographs from Jose's show up at the Brooklyn Public Library. And they look great on the blog. Let's face it, we are so thrilled. We did a happy dance and told our friends to check it out. Yesterday was a really good day.
Then, this morning, WOW. The story we thought was reserved for the Lens blog is also published on the Metro page of the printed New York Times! Whoa! Color photographs, big spread, JEEPERS! And they included a portrait of the artist. It was pouring hard that day when they took the picture. But Angel Franco got the shot! Such a pro, that guy. And loveable!
Anyway, in my quest for endless promotion of the biggest thing to happen at Chez Knithound in a long time, it is my sincerest hope that if you still haven't been to see the show at Brooklyn Public Library, maybe this will persuade you.
Monday, July 6, 2009
Well Deserved
 Today is a different day than others for us at Chez Knithound. Today we celebrate a milestone of sorts. We celebrate the recognition of a lifetime of work. The culmination of years of honing a skill and sticking to what is passionate and real.
 Today, the New York Times posted a story on their Lens Blog, "The Gowanus as Muse", with images, and it looks fantastic. Go take a look (full screen mode is pretty cool), leave a comment in their comment section, let me know what you think, too.
Nice going, Jose! Well deserved.
Sunday, July 5, 2009
107 Cookbooks
My friend Amy has a new blog in which she is cooking her way through her massive cookbook collection and posting the results for all to see. Last week I got to taste some of the goods at her birthday party. Mmmm, good!! Go take a look-see here.
Bobbins
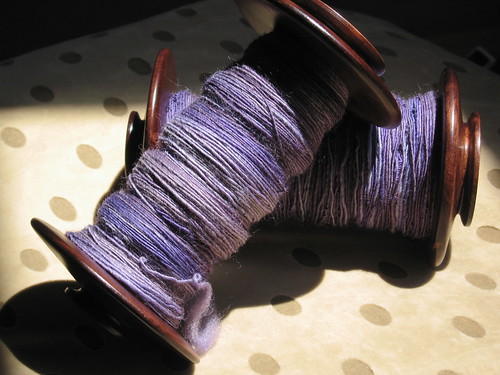
This month's Club shipments featured some Shetland Top from David at Southern Cross Fibres and Amy at Spunky Eclectic.
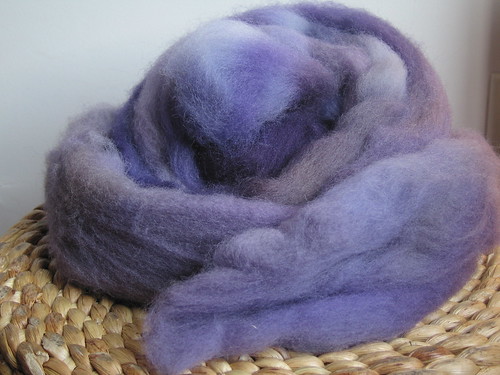
Great minds think alike. I'd never worked with Shetland so I was eager to get started. Shetland fleece is obtainable at Rhinebeck...if I was so inclined...but first let's try it out.
It's soft, it's bouncy, it's easy to draft, this was nicely prepared top. Somehow, and I can't figure it out, the first bobbin ended up insanely overtwisted while the second seems a bit more even and calm.
I think I can overcome this during the next stage, when I ply these singles together. For now I am gonna let them rest a bit.
Progress on the Garter Blanket is not progress. Last night I composed a blog post that told the story, and was just taking pictures to illustrate my point, when I realized maybe I didn't have a point. This blanket is giving me fits. I finished the knitting, blocked the pieces and decided I hated it. That was two weeks ago. Then I started to reknit the thing, and blocked the first section and now I don't know if I was hasty in my original decision because honestly I saw little or no difference. Did I overblock the second version? I need to step away from this one. I cannot believe how hard garter stitch can be sometimes. For now, no pictures, sorry. I have to work this one out a bit before a big reveal.
Friday, July 3, 2009
Care to Knit-Along?
The other night after I posted all my newsy bits I sent a little message to Cosymakes, thanking her for the Snail Hat inspiration. Well. That Cosy is one industrious fiber fiend. She jumped up and down and said, "Hey! Let's do a knit-along! Wouldn't it be cool to see a whole bunch of these hats, all done up in handspun yarn?!"
I couldn't agree more. She got to work right away. She set up up a thread on Ravelry. The Hats-Hats-Hats group got wind within minutes and made this one of the July knit-along projects. And of course, Cosy put word on her blog. Through the magic of all things Ravelry and the Internet, kintters and spinners all over were jumping on the bandwagon and scurrying off to find the right yarn.
Do you have bulky yarn marinating in your stash? (I know you do, I can't believe I'm even asking). Do you want to destash a bit? Need a quick gift? Here you go, a classic hat style from the master of all master, EZ. Quick, fun, funky. And if you can make one in handspun, oh the joy. Give it a try, and post your results on Ravelry.
I saved the best for last, heh. Cosy is generously offering up a skein of her awesome handspun yarn as a giveaway if you post, twitter, join up, talk up, get the word out. How cool! I can't wait to see all the results.
For me, I will try the pattern with a commercial yarn and if I have the time, another handspun.
If you have questions you can post here or on Raverly.
Wednesday, July 1, 2009
Fit as a Fiddle
Whew! My laptop is back up and running and feeling better than ever. The new RAM and new wireless router combo really did the trick. Thank God, too. I can load photos quick as a *blink*, and I can surf the Internets like a normal human being in the 21st Century. Welcome, pilgrim! I am so relieved.
Lots of news.
After all the yarn spinning of late I assessed my growing collection and realized I had a Baker's Dozen in finished yarns! It sort of flabbergasted me, how in the world....oh yea. Like I might have been a bit obsessed lately?
Just as I was knocking around a notion to knit up something using handspun, lo! cosymakes went and made a hat using her own handspun. It was so cute! Shameless copycat that I am, I knew what I had to do. Just had to.
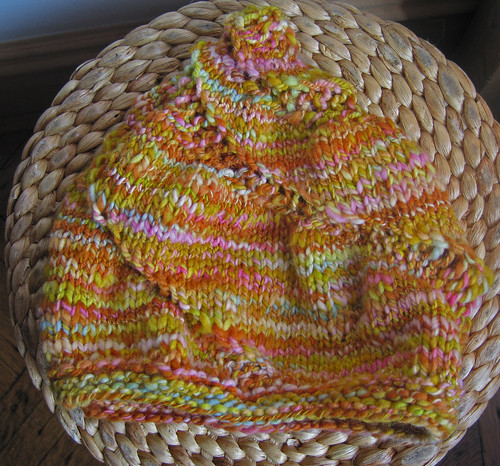
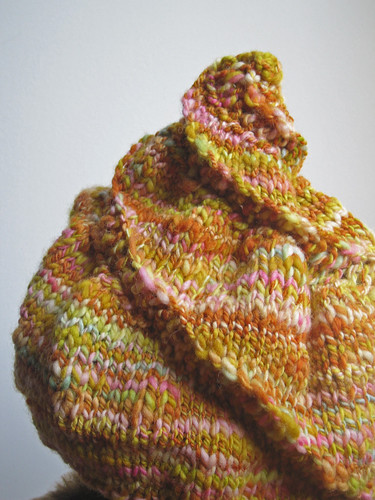
I used the Hello Yarn Thrive Corriedale from February and made this Snail Hat designed by Elizabeth Zimmerman. What a zing-pow-pop collection of color, I tell you! This is one joyful hat. On a dreary day this could come in handy for finding me in a crowd. Remind me to wear it if I plan on attending an event and I don't want to get lost...
My love for this yarn cannot be understated. I LOVE LOVE LOVE this yarn. It puts a smile on my face every time I see it. This color mix hits some sort of pleasure nerve in my brain. Pairing the yarn with this pattern, which to me hangs right on the edge of fuddy duddy... but not...well anyway, every time I put this hat on, I giggle. Wear it proud, I say.
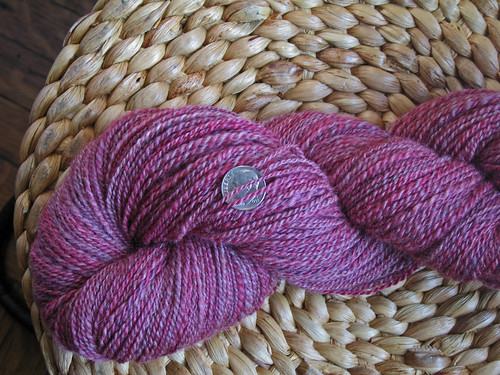
And since I am on this spinning track more than ever these days, here's my latest yarn fresh off the wheel.
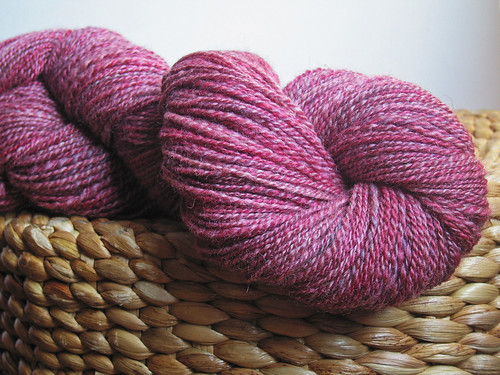
And since I am on this spinning track more than ever these days, here's my latest yarn fresh off the wheel.
It's Bluefaced Leicester hand dyed by pumpkinmama and sold on her Esty store, Vines. I am really pleased with this one. 312 yards, 13- 14 wpi, really consistent and so soft and squishy. This one deserves knitting attention.
There's some exciting stuff happening in July, and I've been dying to tell you all about it. Being shut off from the Internet was so frustrating! Some of you might remember my 2009 goals included all things hand made. In addition to spinning and weaving (yea that's going to happen, really), I included upholstery!
After six months of waiting, I got an email two weeks ago announcing space in a July series of classes and I jumped all over it! Every Tuesday this month I'll make my way to The Furniture Joint on Great Jones Street in Noho for a few hours of hands-on learning. Visions of recovering my Hans Wegner Dining Room Arm Chairs! For starters.
And what if... what if... the weaving... the handspun... some fabric... chair covers... pillows... embroidery on fabric, fabrics made with with handspun yarn... what if... hmmm. There is the barest little plan formulating... Okay. Enough for now. But it just might be...a GrandMasterPlan starting to simmer in this middle-aged-bored-to-tears-with-corporate-life-brain of mine. Just to say, the Third Chapter could be really fun. Seeking.Fun. And the journey itself ain't disappointing either!
Subscribe to:
Posts (Atom)
