Saturday, August 29, 2009

New Yarn

These were made a few weeks ago and I've been so busy it's hard to find time to post to the blog.

Five Plum Pie 2 skeins #2

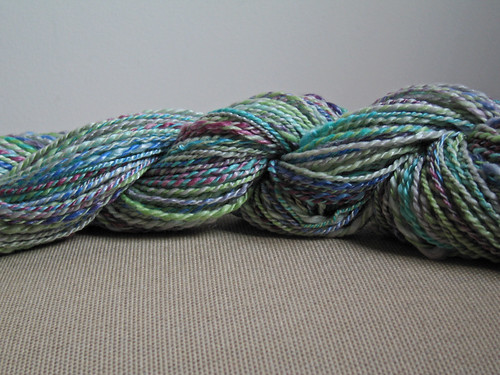
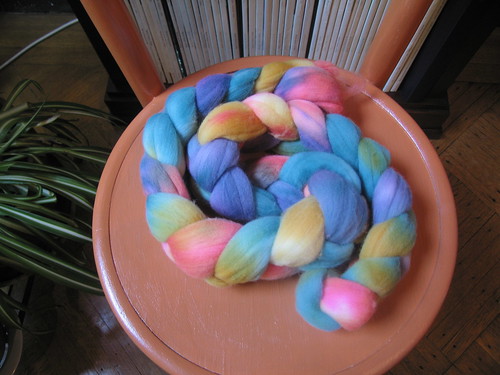
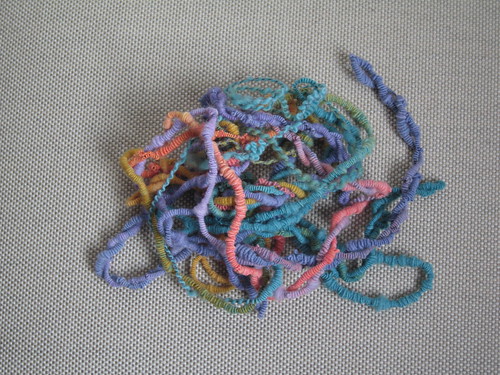
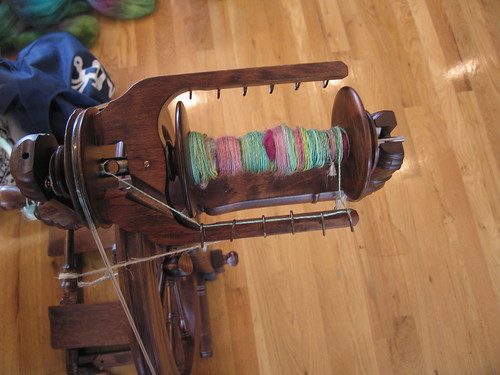
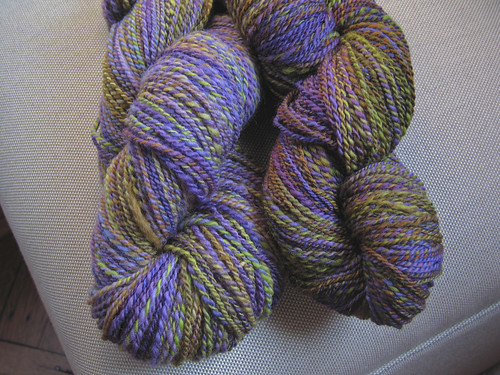
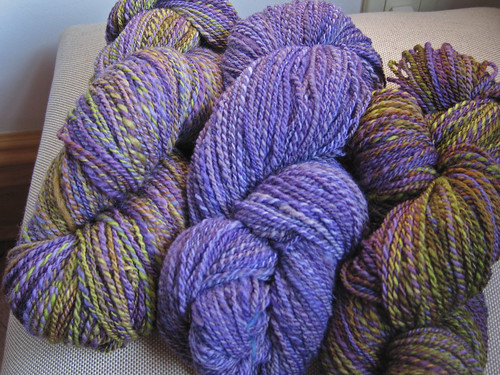
These lovelies are from my Hello Yarn club - Five Plum Pie. Note that the colors are distinctly different. One of the pains of knitting and spinning after work hours is lack of decent daylight. Had I noticed this prior to spinning, I might have split the two tops down the middle and exchanged them to get a more even color match between the two skeins. This is the world of hand dye! Next time I am going to carefully inspect the two bundles in the daylight and make adjustments as needed.

Five Plum Pie 2 skeins #3

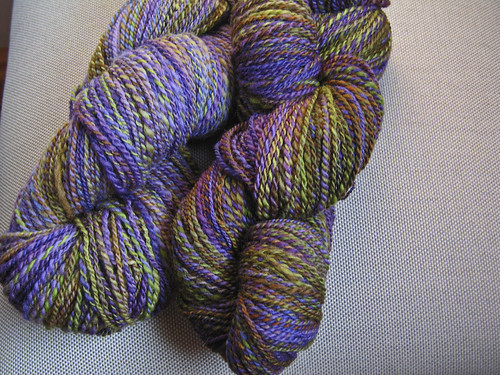
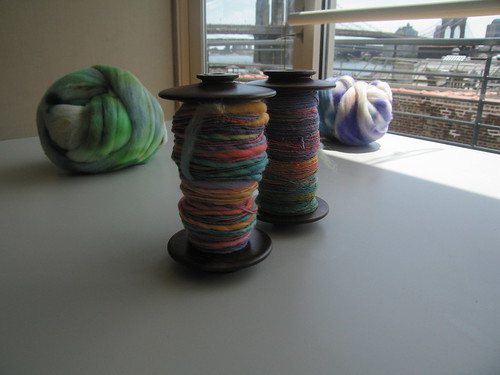
But it doesn't matter all that much. I am super pleased with these skeins and I just love the way the colors lined up and complement each other. Adrian has a real gift with color combining and her fibers look smashing no matter what you end up doing with them. This is Falkland, one of my favorites fibers to spin. It comes up lofty, squishy and decently soft. I netted about 550 yards which also pleases me to pieces. The more yardage the more options for projects! I'd say the yarn is somewhere between a DK and Worsted weight.

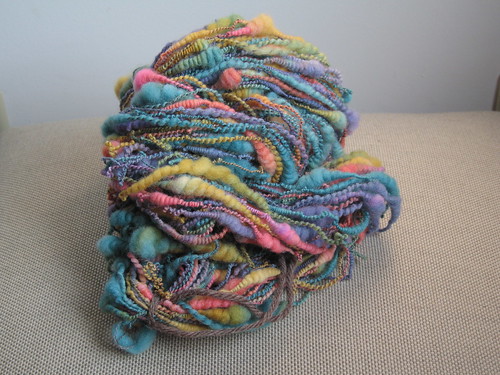
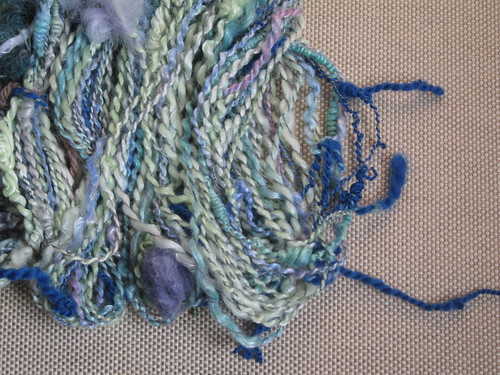
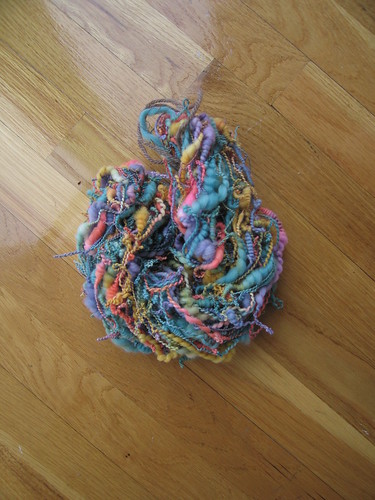
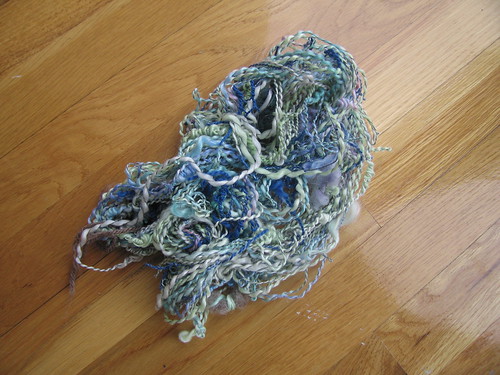
But wait, there's more! After I finished these yarns I dropped them into the handspun basket and they aligned themselves next to the lovely Irises Shetland from Southern Cross Fibre, spun up earlier this summer.

Five Plum Pie with Irises #1

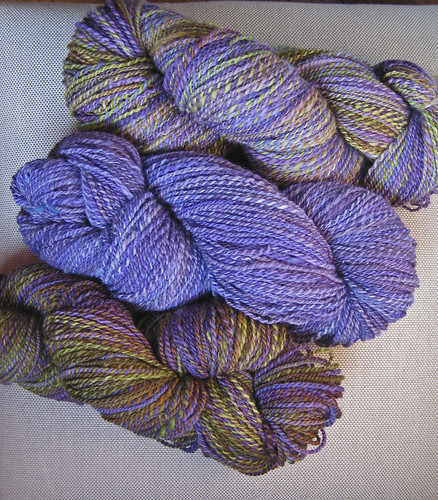
Well lo and behold, the three skeins, laying together in the basket just clicked and I realized these can be worked into something striped. Which would help overcome the lack of matchy on the Five Plum Pie skeins. With 244 yards on Irises plus the 550 yards of Five Plum Pie I might have enough to make some sort of garment. David and Adrian both outdid themselves with their club creations and I love the result!

Five Plum Pie with Irises #2

At the moment I'm leaning toward a simple vest, but haven't come up with just what. On the other hand the idea of combining my skeins has also led me to consider adding to these three, over time, until I have enough to pull off a full blown sweater. Which might be the ultimate in knitting and spinning fun and well worth the time it will take to spin and collect like-minded skeins.

Tuesday, August 25, 2009

Show Extended

Those of you on Facebook already know this. I thought I'd tell the blog world as well.

Jose Gaytan's show, "The Gowanus: Brooklyn in Transition" currently installed at the Brooklyn Public Library will stay up just a bit longer! The show has been extended to September 11.

If you happen to be in Brooklyn, please do stop in to see it - the main branch is right on Grand Army Plaza.

Friday, August 21, 2009

Forward Thinking

Keen observers of my blog may have noticed two links I added about six weeks ago: Joy of Giving Something and Forward Thinking Museum. There is a method to this madness. Things are happening. Doors are opening, paths are forming through the forest, conversations are taking place.

If you have a few minutes, take a stroll through these two sites. Really interesting stuff.

You might even stumble upon this and enjoy the take.

Thursday, August 20, 2009

She Does TOO Knit!

I'm convinced I've successfully chased away all knitters from this blog by now, and they are all wondering why I don't just give up the ghost and call this a SPINNING blog rather than a KNITTING blog.

To prove to you that I have not eliminated knitting from my life, here's a pair of socks I finished about two weeks ago.

Pointy Toes

My sister was in town and so I finally had a foot model and after she tried them on, it was apparent they fit her better than they do me, so once blocked, these are headed out west to Corte Madera (in Marin County). If there are still hippies living there, then she will be able to infiltrate their ranks without notice.

The pattern is my first from the book, Knitting Vintage Socks by Nancy Bush. These are the Madder Ribbed Socks (rav). I have been admiring the patterns in this book for about 4 months. The book is by my bedside and I've read the patterns one by one, thinking about the yarns I will use to recreate them for myself. Many is the night I've fallen asleep with this book on my face after I get through three lines of a pattern.

Yes, I know, I know, reading knitting books in bed is the epitome of dork. I'm okay with that. And you can stop laughing now, thank you.

Madder Ribbed Socks on Claudia

The ribbing in this pattern is terrific. I really like them and will use this rib again. The heel is a bit different from my usual one, in that it did not have the slip stitches one usually uses, and I will be curious to see how it holds up. The gusset was another new approach, with the three rows between decreases and the right side decrease was a bit different too (the traditional sl1, k1, psso rather than the more modern, ssk). Cool. (Dork alert!). But note - this is a book on Vintage Sock patterns so of course it includes using the traditional method of making a left slanting decrease!

The toe is not my favorite, as I prefer a straight edge rather than this pointy bit, but I wanted to knit this pattern as written, so I went with it. With this yarn, the toe gives these socks a bit of an elfish or hobbit look what with the Noro yarn. That's okay, too.

Madder Ribbed Socks Heel Detail

The way this pattern is written, so that it flows from one section to the next completely seamlessly was what I really noticed. This was well thought out and well documented and I really enjoyed the process. So much that I've pretty much decided I am going to knit every single pair of socks in this book, one by one. So you will be seeing quite a few socks in the coming months, and all of them are going to be these new twists on classic patterns.

Now let's talk about this yarn. I am a Noro love slave. I see this yarn with all their pretty colors and I am a woman caught in the throes of pure lust. Without warning, I grab up a few skeins, my head and heart pulsing with excitement, and before I can say "get a grip!!" I am standing at the cash register handing over ungodly amounts of money to satisfy the crave. Unstoppable. And shameless.

In the cold light of the new day I look back on my wanton behavior I regret just a teensy bit, because sure as the sun rises in the east, there are issues with Noro yarns. In this case, I knit up the first sock and of course there were color sections I liked more than others. That always happens too. I pick my favorites and gaze upon those sections lovingly, pleased in how the colors shift and work into each other. That's the seduction, isn't it? The subtle shift and pairing of the colors? In this case, the lovely reddish-teal transition down the foot on the first sock quickly became my most favorite section and I was GIDDY to think this would be the part that shows on a pair of shoes. See it there, right over Rudy's big nose? Yea, that's pretty isn't it?

Madder Ribbed Socks with Rudy

I diligently wound off a bunch of yarn to set myself up at roughly the same starting point on Sock #2. For me, that's part of the challenge with Noro sock yarns. Making them sort of line up on the colors. I did it pretty successfully the last time out with that nasty Noro Kureyon sock, and thought it would be the same here with Silk Garden Sock.

Noro does it again - ARGH

Until I was on the subway one morning and I came upon a knot. You Noro knitters out there know what I am talking about. THE KNOT. And what was beyond the knot? Yep, a complete break in the color shifts, and guess what, my favorite part, the reddish-teal transition was GONE. Did not exist. Spitting nails, I put this down for two weeks to gain my composure.

When I was ready to resume, I did the best I could, using gray to substitute for the missing section and then worked in the greeny bit to the toe to approximate the first sock. There are many of you out there who will say, "no big deal", and "go with the flow" when it comes to Noro. But for the expense that this yarn represents, I stick to my guns.

I will resist the siren call of the Noro. Until the next time I see all those pretty colors and completely abandon all resolve.

Monday, August 17, 2009

Just Can't Stop

Last week I actually did not look at my wheel at all. Instead it sat in it's carry case until sometime Friday evening, after a busy day with my sister and mother which included 5 hours of spreadsheets and followups for work (a vacation day?!), the movie Julia and Julie and a trip to the grocery store. Two roasted chickens with fresh veggies later, I finally retreated to my office/spinning/fiber room to see what I could do about the ever growing fiber stash.

Something crazy came over me. I decided it was time to tackle the Merino/Tencel blend from April's Hello Yarn club shipment. I'd already used some of it for the workshop, and decided it needed to be transformed to yarn. Three hours and two bobbins of freshly spun singles later I staggered off to bed. Oh! My aching back! My joints creaked all over.

Hello Yarn Air 2 ply #3

Little did I realize then, I was so wrapped up in the spinning, but I was setting myself up for some issues down the road. I spun with a vengeance Friday night. I might have overspun? What was I thinking? Turned out the bobbins were so kinked up that on Saturday night, I tried to ply and was getting some pretty shameful results. I just cut off the junk I'd just made (but I kept it - I can't seem to throw any piece of crap yarn away ever. I might neeeeeeed it....) and ran each bobbin through the wheel to relax the fiber. Okay I thought, not a big deal, this happened once before and it worked out great.

With the bobbins full again, I set about plying the yarn. Still some hurdles. Was I holding the yarn too tight? Did I put too much resistance on the ply? SNAP!! I broke the brake band! I might have had the tension set too high? Ya think? Okay so it's just a jute string, no biggie.

I tied a knot and kept on going. The singles still had some serious twist which I guess I was trying to forcibly straighten out, thus causing the break. I even broke the singles in a few places. So this is not the best yarn I've ever made. There are plenty of uneven spots, the yarn has varied thickness from 12wpi to 8 wpi, the ply is not smooth.

Hello Yarn Air 2 ply #1

Despite all it's faults or maybe because of them, I think it's pretty! I love the sheen that the Tencel brings to this yarn. And I really like how the colors ended up because I honestly didn't know if I liked it in fiber form. It is drapey yarn too. I don't know yet what this yarn wants to be in finished project.

And I will go back to the drawing board on the Merino Tencel blends. I picked up a Jacquard Dye sampler set so I can dye my own and then practice. Still so much to learn!

Sunday, August 16, 2009

Workshop sampler

Some of you have been waiting patiently for me to share the various yarns I made during last weekend's workshop. Thanks for indulging me, it was a busy work week and my sister was in town over the weekend. To top it off, I had a relapse on a summer cold, which is so rare for me. It made getting through the week that much more exhausting.

I'm finally ready to show you what I made. Some of these techniques are really interesting and I want to work on them some more.

First up, the Coils. I used the most fantastic fiber, purchased from Pumpkinmama, called Vibe. Here's what the fiber looked like before it got spun. Eye popping, isn't it? I love it, which is unusual because I lean toward more subdued colors, but when I saw it in her Esty shop, I knew it would be perfect for the workshop!

Vibe

This being Targhee, it is squishy beyond belief. I do love Targhee! The color breaks make the coils really pop. The Vibe was spun as thick and thin singles and then plied with a gray merino laceweight I picked up at School Products just for the workshop. I like how the gray tones down the Vibe just a bit. The coils were more defined before the yarn was washed, and now they are very plump little babies.

Coils #1

Reflecting back on this project: obviously I need more practice in the technique. But now that I see how the coils plumped up after the bath, I would work on making them very stable in the spinning. There's a part of the technique called 'anchoring' that I need to incorporate.

I see this technique could be really fun in scarves and hats. Also trims around collars, cuffs, that sort of thing.

Next up was Twists . This yarn is a combination of Hello Yarn Air (Merino/Tencel), some Ashland Bay Merino and I can't remember what else. The Twists are interesting in that they create a 'shaggy' look. Properly applied, this could be a fun yarn for scarves. The twists are in the blue Merino, and I threw in some more coils, for fun. This yarn was also plied with the Gray lace weight. Good thing I bought a cone of it! There are also attempts at embedded objects, but they do not look good. Definitely some practice needed here!

Twists, Wrapped Objects #1


How about some cocoons and beehives? These are another way of making coils only with singles rather than in a ply. I would say this will need some more practice, but worth it if you want singles with good fun mixed in. Fibers are combined Hello Yarn Air, some borrowed roving from Donna (a dream to spin, I will seek out this seller at Rhinebeck!!), and bits of fun stuff from the workshop.

Cocoons, Beehives #1

We worked on Corespun, which I really like and want to do more. This was a batt provided at the workshop. My first attempt at batt spinning, very intriguing. There are so many wonderful batts out there and I am now a convert. More corespun in my future! This first attempt is not great. The trick is a 90 degree angle and a light touch. If I recall, put the tension up on this technique so it takes up quickly onto the bobbin. I added an over wrap of sparkle, borrowed from Cathy, (thanks Cathy!!) but it got a bit complicated so I dropped it after a bit. There was enough to handle just getting the corespun to go!

Corespun with Sparkle overwrap #2

We worked on Halos and Circles next and this was fun! The Halos are made from Cocoons that are then twisted into little loops when plying. The circles are similar to a boucle. The first thing is to spin up some singles, using Spunky Eclectic Beach Day (merino/bamboo) adding cocoons as you go, and for the circle section we used some amazing mohair, and spun super thin. This was my first mohair experience - very similar to long wools like Romney, Wensleydale or Masham. I love long wools so I will definitely be working with Mohair in the future.

Circles and Halos #1

Once the singles are made up you get to ply the yarn and that's where the fun really begins. Each cocoon gets twisted up into a little loop, anchored and away you go. When we reached the mohair sections, we angled at 90 degrees and just fed it on, very loosely, anchoring start and finish. I liked making this yarn very much and want to make more.

Circles & Halos #2

Last but not least, Super Coils! This one has sooo much potential, but the result last Sunday is a mere glimpse at what can be achieved. The Vibe was put into use once again, this time the singles we spun as homework before the class - the top bobbin in the photo below.

Coils bobbin on bottom, Vibe singles on top

In this yarn you simply wrap the yarn around a core but unlike a corespun in which you start with a batt, you are working with a spun up single so you get a very ropey wrapped yarn. If I were to do this again, I would want to work with fatter singles, as it would take forever to finish this one!

Super Coils


Did you notice the prop in some of these photos? Yep, my little ottoman! A perfect backdrop for yarny pictures. You will see more of this project as time goes by. I might even sit on it from time to time. Yes, it is sturdy! I want to update you on my further reflections of the Upholstery class, but I'll get to it later this week.

I loved the yarn workshop. I learned a ton and it opened up a kinds of possibilities. And I bought the CD, so I can practice some more. If you want to really explore a whole new range of yarn wonders, I recommend the CD or if you can, take the class. Jacey is fun and encouraging. And she can spin a really mean yarn. Seriously. Inspiring.


Monday, August 10, 2009

Becoming Insubordiknit

Jacey awesome spinner

Okay folks, once again, I have entered another new dimension of fiber heaven. This time, led by Jacey Boggs, of Insubordiknit fame, I got down with a group of serious spinning fiends for two solid days of playing with fiber and yarn making - awesome, outrageous art yarns. Lucky us, the entire event took place in a gorgeous setting down by South Street Seaport - Seamen's Church Institute.

Many years ago I attended a wedding at the same place and I remember being so impressed with the views of Brooklyn Bridge, the Seaport and the neighborhood. The top floor is like being on a ship's prow, which is appropriate for a Seamen's Institute, now isn't it?

Two bobbins of Vibe

Here you see two of my bobbins enjoying the view of the Brooklyn Bridge! This weekend, the focus was on the fiber. But what a great space! There was lots of room for us to spread out, and the natural light was simply superb. It made the entire experience really special. And we could SEE what we were doing! And we were able to leave all our stuff over night making the whole experience easy peasy.

Donna - Bunny Mom

Donna, aka BunnyMom is enjoying the airy open space and it's a good thing we had all that room because she brought a fiber bump that was supposed to be about eight oz. Umm, right. After fluffing it out for about an hour, and seeing the huge pile on the floor, we giggled because there was seriously, about 2 pounds of fiber from one bump. Spins nice, too. Thanks, Donna!

singles with cocoons to be plied

We learned coils, wraps, halos, beehives, tiny circles. We laughed, chatted, oohed and aahed over each other's yarns and provided encouragement to keep on spinning. Jacey is entertaining, informative and very upbeat. Her Mom, who came along for the ride - it's New York after all! - was so adorable.

Coils Yarn before soak

Jacey sets the bar high, which I appreciate. She wasn't afraid to show us what we were doing wrong and how to correct. These techniques require finesse and practice. Her standards for the art yarns are the same as any other yarn: well balanced, knittable yarn.

Her teaching method worked really well: see it, try it, adjust it, try it again. As we learned a new technique, Jacey invited small groups up to the front to watch how she worked the fiber. Then we retreated to our wheels to try it. As the next group went up, we all had the advantage of listening to her talk through it again.

painted wheel so cute

Christina aka miukat was so excited about the workshop she painted her wheel to match her dress and jewelry. She added a bunch of designs to make it look like a peasant ox cart. Amazing!

It looks better in real life

There's lots to practice. Some of these techniques hold appeal: corespun, coils and wraps. Halos and beehives are interesting, too. Once the workshop samples are set I'll post pictures and show you some of the details.

Oh man, was this fun! I learned new things. I was completely immersed in the challenge and the tactile pleasure. So satisfying, so challenging, so interesting! Whew!

Wednesday, August 5, 2009

Photo Galleries


The positive fall out from the recent publicity in the New York Times continues! We learned today that Legion Paper, makers of the fine Moab photo paper set up a photo album on their Facebook page.

Jose used the Moab paper for his exhibit, which is still up for view through the end of August at the Brooklyn Public Library's Central Libary on Grand Army Plaza. He is a real fan of their product as it makes fine exhibition quality prints.

If you have access to Facebook and really who doesn't these days, well then take a look at the album. There are images there not seen anywhere else!

Tuesday, August 4, 2009

Variation on a Theme

Another Snail Spiral hat. This one with black yarn. How is it I have been knitting for over three years and this is the first black project I've made? I wanted a more 'urban' look with this one.

Black Snail Hat

I made this a couple of weeks ago over the course of about three hours that included a King Sunny Ade concert at Celebrate Brooklyn and some quality Nurse Jackie time. These hats are that easy and fast.

Sunday, August 2, 2009

Upholstering, Part 4

This is the night we finished our little ottomans. I arrived to see that the instructor and his assistant had taken the liberty of attaching the little cord around the sides.

ottoman 002

Next up, attach the fabric that will cover the sides of this ottoman. It was pre-cut for us before we arrived, so we just needed to staple it on, upside down, all around, just below that cording.

ottoman 005

Our next task was to apply a tacking strip all around the ottoman, just below the cord, and it had to be very snug! I should say at this point that one skill I mastered in all this was staple removal! I had to make two attempts before I got the positioning of the tacking strip just right.

ottoman 008

In the photo above you can also see the remnant of my near fatal mistake - the one where I cut the fabric in the wrong place. All these sins, hidden from view!

After the tacking strip, the Dacron wrap. Making sure there is 1/4" of Dacron above the tacking strip, and pulled just snug but not too tight, staple along the tacking strip - use lots of staples - one right after the other. Then tack down the Dacron on the sides.

Time to pull the fabric down, and make all the little adjustments so that the Dacron underneath is straight, and the fabric is pulled taut. Staple around the bottom of the ottoman to secure the fabric. Now, to make the bottom neat, use some cambric to cover up all the stapled fabric. You've seen cambric before on your own furniture. It's that black or brown mesh-like fabric. It simply gets folded in and stapled down, with corners neat and tidy.

The last step was a bit of hand sewing, using a really cool curved needle. The seam on the side where the fabric ends meet needed to be carefully adjusted and then using a basic stitch, the seam was made. This part might have been the easiest for me.

The finished ottoman!

ottoman 014


I'd give myself a B- on the overall job. Which, considering it was all so new to me, was pretty good. The instructor would probably give it a C. The ottoman is a bit uneven on the top. I can see all the spots where the fabric was not attached consistently.

I found the work to be somewhat physically demanding, which surprised me. Using the staple gun was hard on my hands. It took awhile to get comfortable using the stapler. I found myself shifting from the left hand to the right, searching for the one that felt the most at ease. There were times I was contorted in odd positions to get the stapler in position. Using it to make firm, even staples took some practice but by the last class I felt more confident in that.

My wrist got very sore the night we attached the fabric to the top. It felt like a serious carpal tunnel coming on, and it affected my ability to apply even pressure on the fabric. I broke a sweat in each session, and got home completely drained. The last night I had to haul the ottoman on the subway and walk the 5 blocks home with it, and my laptop and my change of clothes. Exhausting!

But I remain undaunted. I have a book with projects arranged from easy to challenging, and I would like to embark on some of these to see how I improve. For now I am a bit relieved the class is over. And the little ottoman is resting in the living room. It will appear in knitting photo shoots if the weather ever lightens up!